i love to make mask and i will show you how to make some this is the first part
How to make a lucha libre mask from a tee shirt. The ideal project for fans of wrestling, kids and emergency Halloween costumes.
- by BigMex
Materials needed:
A tee shirt (men's medium size)
Scissors
Pins
Sewing Machine or thread and needle
Steam Iron
Heat Bond, Hot Glue Gun or Fabric Adhesive
Different colored felt squares or fabric paint / markers
Genuine BigMex mask template and face template (download here)
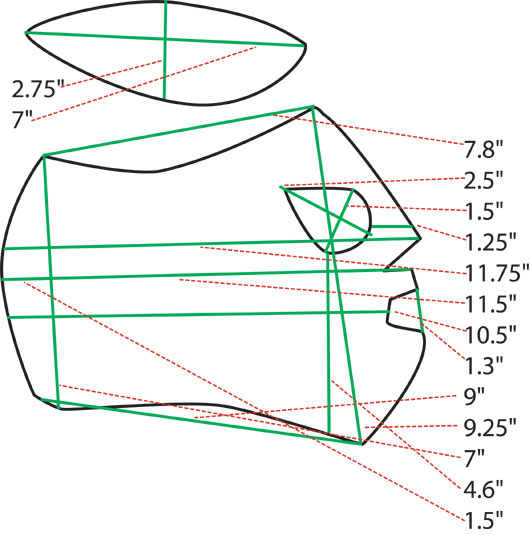
First thing is first, get all your materials together, print up a template or cut one out of a large piece of paper. I'm lucky enough to have a printer that can handle tabloid-sized sheets at work. You can get the same dimensions by taping together two letter-sized pages together (11 x 17 inches). Make sure you print up two copies for the left and right side of the mask. Here are the dimensions of the mask in case you want to freehand it on an art board.
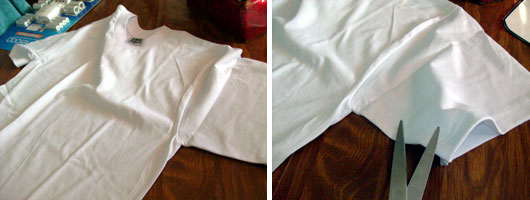
 Now take your tee shirt (wash it first!) then cut it down the side, from the sleeve under the armpit all the way to the bottom. Repeat the cut on the other side so you have your tee split in half. Make sure to leave the neck hole intact.
 Now take your templates and place them on either side of the tee. Make sure they are centered and as close to the neck hole as you can. Don't forget to cut out the eye holes on the template.
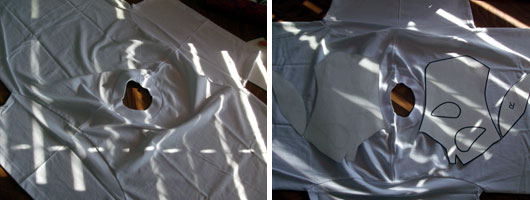
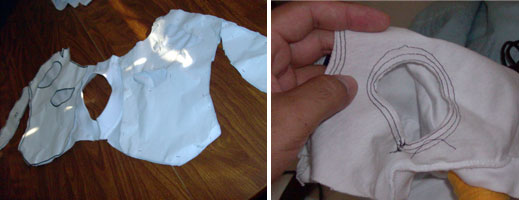
Lay the tee shirt flat on a table, this will make the next few steps easier. Pin the template to the tee and cut out the pattern. Save the rest of the tee shirt for other masks.
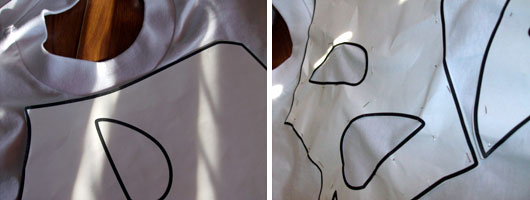
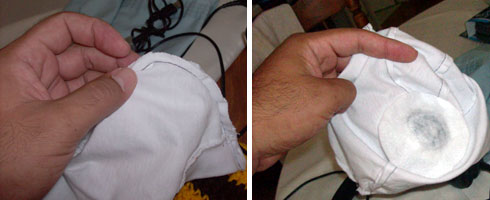
Before you begin sewing the pattern together, very carefully sew a hem around the eyes, nose and mouth before you cut it out. This will strengthen the material against tears. You can now take the paper pattern off of the material.
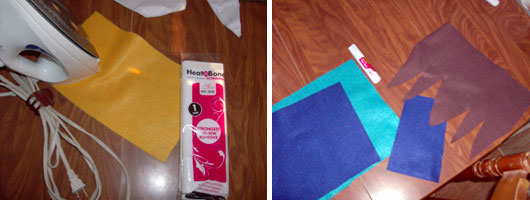
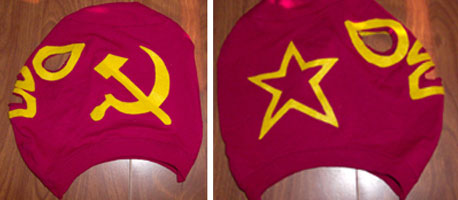
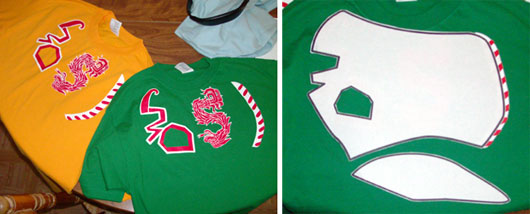
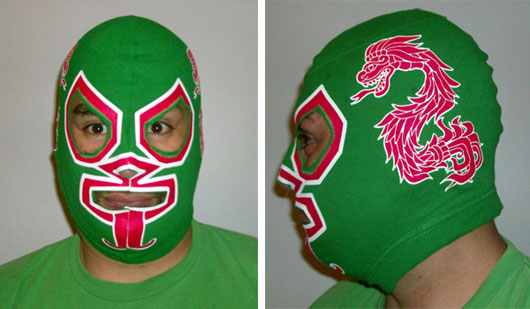
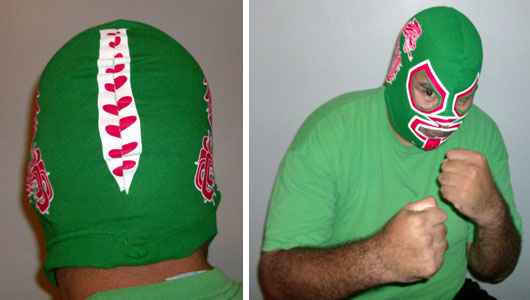
Now is when you should add the trim and details for the eyes, nose and mouth. The generic pattern is on my second face template. When I made my Zangief-inspired Soviet mask I used heat bond on a couple of felt squares. Felt squares are available from your local craft store for around 25 cents per 1'x1' sheet. On any edges that didn't take I used permanent fabric adhesive or hot glue. You can also use fabric paint to draw patterns and contrast the eyes, nose or mouth on your mask.
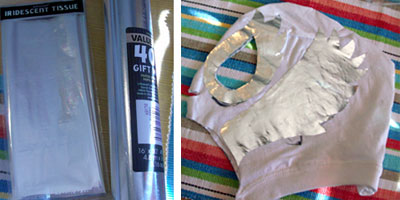
If you want to be fancy you can get a nice metallic trim if you use metallic foil gift wrap, foil tablecloth or even a holographic effect if you use iridescent tissue. You can combine the foil and tissue paper and cut out small patterns and affix them to the mask with permanent glue sticks.
 If you are drawing a blank and don't know what types of patterns or color combinations you can use then get inspired by the actual masks featured on Highspots.com. Make sure you affix the trim and hem the eyes, nose and mouth before you begin sewing the four main parts together.
 As my pal Darryl said "sewing curves is a pain in the ass." Even if you are good with a sewing machine it is still a pain. If you are sewing by hand just be very patient with the four pieces. If you have never sewed before here is how you do it. Put the two halves on top of each other, making sure it's inside-out, pinch two halves together and sew them about 1/4 of an inch from the edge. Your seam will be inside the mask and clean on the outside. Repeat these steps for the top of the head, the front and back. There should be extra material on the top of the mask so you will end up overlapping a little. This extra material is actually meant for you to sew in an additional flap if you wanted to make a mask with laces. You can tuck the extra material inside the mask and trim it once it's sewn.
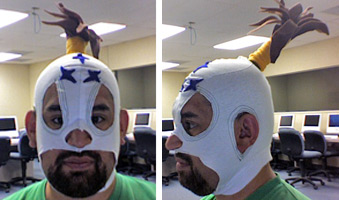
In case you were wondering, the ponytail on my El Fuerte mask is made of two brown felt rolls with a "hair pattern" cut out and a yellow felt roll bound around them. I cut a hole in the back of my mask and hot glued a white felt patch under the ponytail and then glued that to my mask.
 If you are making two masks out of two different colored tees then you can use the extra material to make streamers and sew them to the head or neck of the mask. I made "elbow pads" out of the remaining material from two masks.
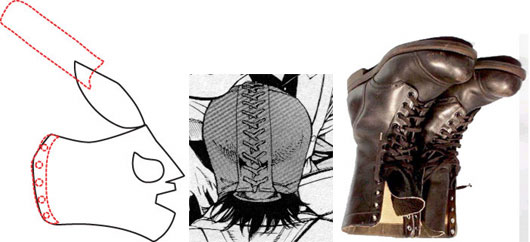
 When you are finished your mask should be very snug. This is because unlike traditional lucha libre masks they do not have laces to bring the two halves together with a more reasonable tightness level. What if you want to make something more authentic out of thicker or nicer fabric? Something that allows you to sew on a contrasting material rather than hot gluing it? All you have to do is print up my template and sew an extra loose piece of fabric to the top back portion of the mask. This loose material will cover the hair. Then and add eyelets (grommets and washers) to the back, for your laces. The extra fabric acts like a tongue on a shoe, the wrestling boot is what inspired the design and the four-part construction of the mask. It really hasn't changed in over 70 years. Check the history of the mask if you don't believe me. All I did was think of a way to make one without the laces. Plus tee shirt cotton is much more breathable and inexpensive.
 Now it's up to you to experiment with the design, make changes on the template, sew in some laces for an authentic look if you want. When coming up with the template I bought a bag of tees from the local swap mall, they were inexpensive and good quality too. I think I'm going to add some non-functional yellow laces to my Soviet mask. If you have long hair you can skip cutting out the top of the mask and just let your hair out over the sides like the wrestlerPsicosis.
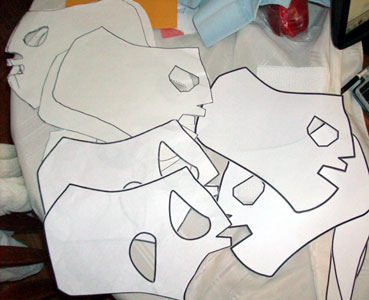
Have fun drawing patterns on your mask and personalizing it. Creating an identity for your masked alter-ego is the fun part. I keep track of all the different templates I've created in a folder. Each mask has a different shape of the eyes, nose and mouth. Keeping each template handy helps when tweaking your design and when figuring where holes for your ears should go. Professional mask makers in Mexico cut their templates out of cardstock, like cereal boxes. They also keep these templates organized in their own files. In this way they can always trace out a new design, including the trim elements, easily and consistently.
 I decided to silk screen a design on the front and back of a couple of tees, including silk screen "laces." These masks will be a project for my cousins to try out. If these test out fine then I'll screen print a thin dotted line around the template for an easy cut and sew pattern.
If you see somebody out there copying my idea and then selling them in a trendy shop please beat them up for me.
 Have fun making your own masks and share the projects that you make with the rest of the online community.
 Have a great day amigos!!!
How to make a lucha libre mask from a tee shirt. The ideal project for fans of wrestling, kids and emergency Halloween costumes.
- by BigMex
Materials needed:
A tee shirt (men's medium size)
Scissors
Pins
Sewing Machine or thread and needle
Steam Iron
Heat Bond, Hot Glue Gun or Fabric Adhesive
Different colored felt squares or fabric paint / markers
Genuine BigMex mask template and face template (download here)
First thing is first, get all your materials together, print up a template or cut one out of a large piece of paper. I'm lucky enough to have a printer that can handle tabloid-sized sheets at work. You can get the same dimensions by taping together two letter-sized pages together (11 x 17 inches). Make sure you print up two copies for the left and right side of the mask. Here are the dimensions of the mask in case you want to freehand it on an art board.
Lay the tee shirt flat on a table, this will make the next few steps easier. Pin the template to the tee and cut out the pattern. Save the rest of the tee shirt for other masks.
Before you begin sewing the pattern together, very carefully sew a hem around the eyes, nose and mouth before you cut it out. This will strengthen the material against tears. You can now take the paper pattern off of the material.
Now is when you should add the trim and details for the eyes, nose and mouth. The generic pattern is on my second face template. When I made my Zangief-inspired Soviet mask I used heat bond on a couple of felt squares. Felt squares are available from your local craft store for around 25 cents per 1'x1' sheet. On any edges that didn't take I used permanent fabric adhesive or hot glue. You can also use fabric paint to draw patterns and contrast the eyes, nose or mouth on your mask.
If you want to be fancy you can get a nice metallic trim if you use metallic foil gift wrap, foil tablecloth or even a holographic effect if you use iridescent tissue. You can combine the foil and tissue paper and cut out small patterns and affix them to the mask with permanent glue sticks.
In case you were wondering, the ponytail on my El Fuerte mask is made of two brown felt rolls with a "hair pattern" cut out and a yellow felt roll bound around them. I cut a hole in the back of my mask and hot glued a white felt patch under the ponytail and then glued that to my mask.
Have fun drawing patterns on your mask and personalizing it. Creating an identity for your masked alter-ego is the fun part. I keep track of all the different templates I've created in a folder. Each mask has a different shape of the eyes, nose and mouth. Keeping each template handy helps when tweaking your design and when figuring where holes for your ears should go. Professional mask makers in Mexico cut their templates out of cardstock, like cereal boxes. They also keep these templates organized in their own files. In this way they can always trace out a new design, including the trim elements, easily and consistently.
If you see somebody out there copying my idea and then selling them in a trendy shop please beat them up for me.
nice, you just need a cape and you can change your name to "The Green Dragon Asskicker" Id pay to watch the "Asskicker" kick some ass!
ReplyDeleteGreat blog concept, very cool article
ReplyDeleteMuy bueno. I'll be sure to use this way of method before my big match.
ReplyDeletei might try that today... with some tacos... and maybe a burrito
ReplyDeleteIt would be awesome to make a Rey Mysterio mask!
ReplyDeleteLUCHA LIBRE! Woo, thats pretty awesome. Now if only I liked to wear masks.. xD
ReplyDeleteSwweeettt! I love wrestling, and wanted a Luchador mask. Thanx man. Followed.
ReplyDeleteoh looks great
ReplyDeleteHah, nice. I might actually try this since i have so many useless shirts laying around
ReplyDeletelol thats awesome thx
ReplyDeleteWow that's neat stuff! I wanna try this now. Gotta find an old shirt...
ReplyDeleteI'll be making unauthorized withdrawals from banks if I don't get a new job soon, so this could come in handy.
ReplyDeleteNice tutorial, this will be very helpful for me next Halloween
ReplyDeletehahah yessss! this is a crafts project i can get into.
ReplyDeleteThat's strange man....
ReplyDeleteThat's great. Where do you get your chloroform?
ReplyDeleteThose are awesome. LOL
ReplyDeletethat is fuckin awesome when its all done with eh fuck ya
ReplyDelete